简介
优势: 开源, 用户广, 用途广, 社区完善, 新手友好
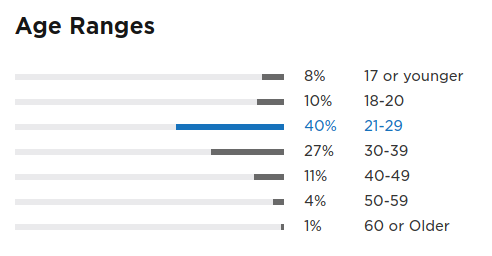
https://www.jetbrains.com/research/python-developers-survey-2017/
2017年的 python 使用调查报告 https://www.jetbrains.com/research/python-developers-survey-2017/
参考网站:
1 2 3 $ pydoc <name> $ pydoc -w <name>
基本语法
语法特点
对象编程的概念1 2 3 l = [3 , 2 , 1 ] l.reverse() l.__dir__()
严格缩进 (通常采用4个半角空格) 1 2 3 if a > 0 : a += 1 print (a)
空格不敏感 1 2 a + b * c ** 2 / d f (a, b)
大小写敏感, 使用大小写组合的变量名风格
(下划线仍是合法变量名字符,但有特殊含义, 见 Python 进阶#脚本相关 ) 1 from scipy.interpolate import BSpline
1 2 import pandas as pddataFrame = pd.DataFrame(array)
IDL sav 文件读取
括号内换行不用换行符
单行注释 # ...
多行注释__doc__变量), 可以用 help() 打印
同一行不同语句之间可用分号分隔
列表和数组的索引默认从0 开始
列表的最后一个元素可以加逗号 1 2 [1 , 2 ,] {'a' : 1 , 'b' : 2 ,}
etc.
print函数
1 print ('a=%.3f, b=%.1e' % (a, b))
a=1.000, b=2.0e+001 print (f'a={a} , b={b:.3 f} ' )
a=1.0, b=2.0001 2 3 %%python2 print ('xxx' ),print ('yyy' )
xxx yyy1 2 3 %%python3 print ('xxx' , end=' ' )print ('yyy' )
xxx yyy更多格式化参考 https://pyformat.info/
基本运算
运算符参考:https://en.wikibooks.org/wiki/Python_Programming/Basic_Math https://www.tutorialspoint.com/python/python_basic_operators.htm
29.0TrueTrue字符串
用双引号和单引号皆可 (取决于所引内容).
'aaaaaaaaaa''ab''a'\nlist, tuple, dict, set
1 2 l = [0 , 1 , 2 , 3 , 4 , 5 ] t = (0 , 1 , 2 , 3 , 4 , 5 )
[0, 1, 2](0, 1, 2)[1, 3][5, 4, 3, 2]list 常用运算
1 2 3 4 5 6 7 l = [0 , 1 , 2 , 3 , 4 , 5 ] l.append('x' ) print (l)l.insert(3 , 'y' ) print (l)print (l.pop(1 )) print (l)
[0, 1, 2, 3, 4, 5, 'x']
[0, 1, 2, 'y', 3, 4, 5, 'x']
1
[0, 2, 'y', 3, 4, 5, 'x']1 2 print (l * 2 ) print (l + [6 , 7 ])
[1, 'y', 2, 3, 4, 5, 'x', 1, 'y', 2, 3, 4, 5, 'x']
[1, 'y', 2, 3, 4, 5, 'x', 6, 7]list 可以排序 (当元素为同一类型且可比较大小时), 返回到原列表
1 2 3 l = ['b' , 'a' ] l.sort() l
['a', 'b'][1, 2]1{1, 2, 3}set 不可索引, 但可用作 for 循环. 见 Python 进阶#迭代器
1
2
31 2 l2 = [i for i in s] print (l2)
[1, 2, 3]if 语句
python 里没有 case, 只有 if
(非零数值、非空字符串、非空 list 等皆为 True) 1 2 3 4 5 6 7 8 if <条件判断1 >: <执行1 > elif <条件判断2 >: <执行2 > elif <条件判断3 >: <执行3 > else : <执行4 >
相关工具
pip
The Python Package Index (PyPI) is a repository of
software for the Python programming language.https://pypi.org/
1 $ pip install <pkg_name>
(其他命令见 Python 安装和配置#用 pip
安装 python 包 )
Anaconda
Anaconda (https://www.anaconda.com/)
1 $ conda install <pkg_name>
其他命令见 Python
安装和配置#使用 conda 命令 Python 进阶#Anaconda
IPython & Jupyter
1 2 3 4 5 6 !cd && gnome-terminal --window-with -profile='lydia_white' !sleep 0.5 && xdotool type --delay 200 "ipython" && xdotool key Return !sleep 3 && xdotool type --delay 200 "!idl" && xdotool key Return !sleep 3 && xdotool key Ctrl+d !sleep 1 && xdotool type --delay 200 "!csh -c sswidl" && xdotool key Return
http://jupyter.org/
https://nbviewer.jupyter.org/
参考文档 http://jupyter-notebook.readthedocs.io/en/stable/
1 $ jupyter notebook [filename]
常用包介绍
Python 自带包和模块
1 2 3 4 5 6 from math import * from copy import deepcopyfrom pprint import pprint import requestsimport osimport sys
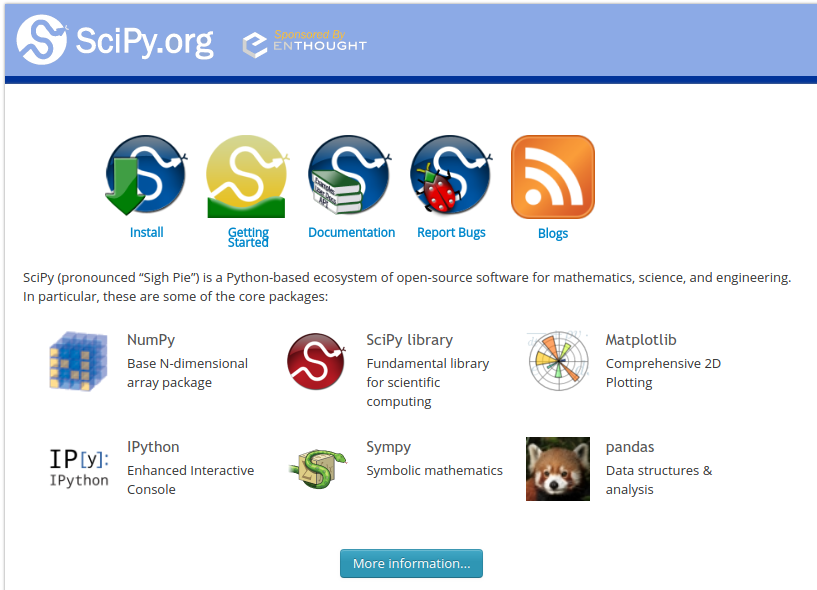
NumPy, SciPy
概览
https://www.scipy.org
http://scikit-image.org
导入包的不同方式将在各例子中看到.
参考:
生成 numpy.ndarray 数组
将 list 或 tuple 转换为 numpy.ndarray 1 2 3 4 5 6 7 8 9 10 11 12 13 import numpy as npa = np.array([0 , 1 , 2 , 3 , 4 ]) a[0 ] a[-1 ] a[0 :3 ] a[:3 ] a[2 :4 ] a[2 :-1 ] a[2 :] a[0 :4 :2 ] a[4 :2 :-1 ] a[[1 , 4 , 3 ]]
多维:
1 a = np.array([[0 , 1 , 2 ], [3 , 4 , 5 ]]); a
array([[0, 1, 2],
[3, 4, 5]])1 2 a = np.array(((0 , 1 , 2 ), (3 , 4 , 5 ))); a
array([[0, 1, 2],
[3, 4, 5]])11从一维数组转变为多维:
1 2 3 4 a = np.arange(12 ).reshape((3 , -1 )); a
array([[ 0, 1, 2, 3],
[ 4, 5, 6, 7],
[ 8, 9, 10, 11]])array([ 0, 1, 2, 3, 4, 5, 6, 7, 8, 9, 10, 11])花式切片的多维例子:
1 2 3 a = np.arange(12 ).reshape(3 , -1 ) a[[0 , 1 ],[0 , 2 ]]
array([0, 6])
np.zeros (shape,
dtype=float), np.ones (shape, dtype=float)
array([[0., 0., 0.],
[0., 0., 0.]])array([[1., 1., 1.],
[1., 1., 1.]])
np.arange ([start,] stop[, step,], dtype=None)
生成的数组元素数据类型和参数一致.np.arange(N ) 中的整数 N 即为
元素个数 .
1 np.arange(6 ).reshape((3 , 2 ))
array([[0, 1],
[2, 3],
[4, 5]])1 np.arange(6 ).reshape((3 , -1 ))
array([[0, 1],
[2, 3],
[4, 5]])
np.linspace (start, stop, num=50,
endpoint=True , retstep=False, dtype=None)np.linspace 和
np.arange 的不同规则
array([0., 1.])1 np.linspace(0 , 1 , 2 , endpoint=False )
array([0. , 0.5])更多数组创建方法见 numpy 官网:https://docs.scipy.org/doc/numpy/reference/routines.array-creation.html https://docs.scipy.org/doc/numpy/user/basics.creation.html#arrays-creation
1 a = np.arange(12 ).reshape(3 , -1 ); a
array([[ 0, 1, 2, 3],
[ 4, 5, 6, 7],
[ 8, 9, 10, 11]])array([[ 0, 4, 8],
[ 1, 5, 9],
[ 2, 6, 10],
[ 3, 7, 11]])更多数组操作见 numpy 官网 https://docs.scipy.org/doc/numpy/reference/routines.array-manipulation.html
矩阵操作见 Python 进阶#矩阵
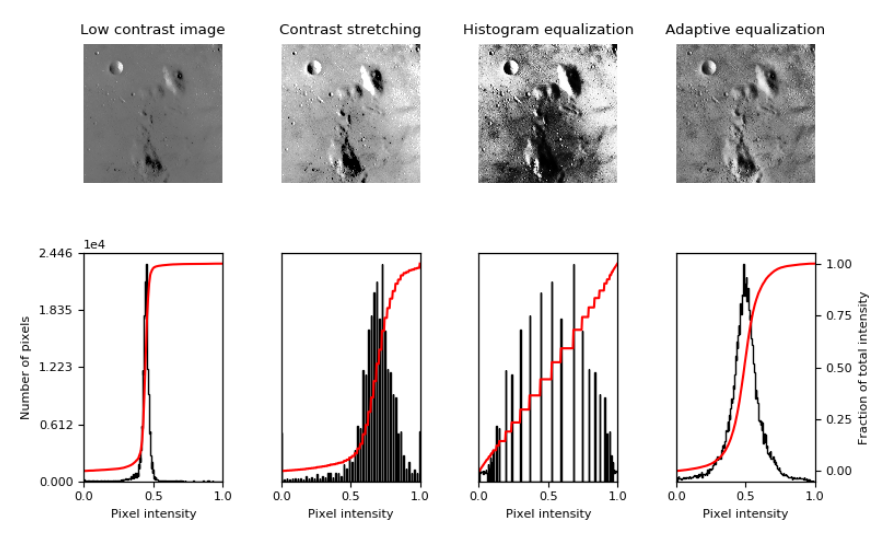
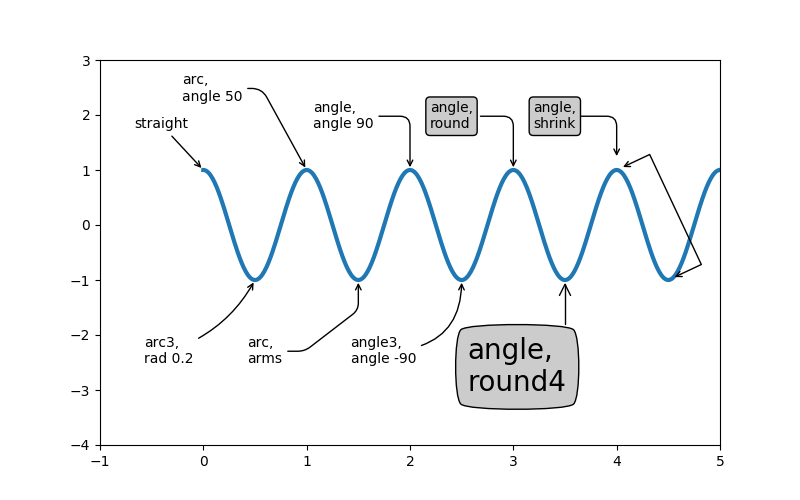
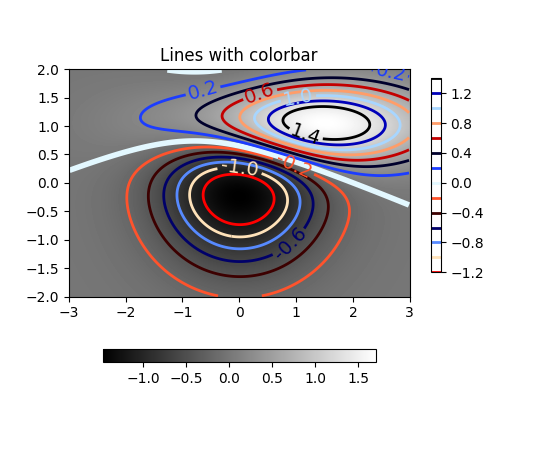
Matplotlib
1 import matplotlib.pyplot as plt
创建一个图像 (三种写法皆可):
1 fig, ax = plt.subplots()
1 2 fig = plt.figure(1 , (12 , 6 ), dpi=100 ) ax = fig.add_subplot(111 )
1 2 fig = plt.gcf() ax = plt.gca()
获取帮助:
例:
1 2 %matplotlib %run -e 'examples/test_plot.py'
1 2 %matplotlib %run -e 'examples/test_imshow.py'
天文相关包
Astropy
官方文档 http://docs.astropy.org/en/stable/index.html
坐标系统 http://docs.astropy.org/en/stable/coordinates/index.html
1 2 from astropy import units as ufrom astropy.coordinates import SkyCoord
参考 https://python4astronomers.github.io/astropy/astropy.html
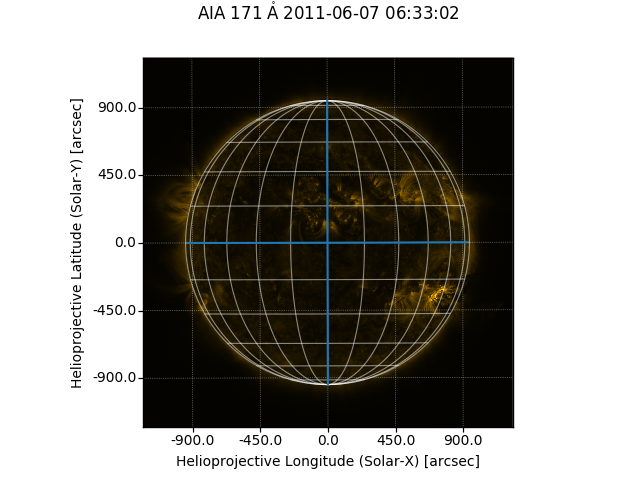
SunPy
Python 进阶#SunPy
示例 https://github.com/lydiazly/scripts-sunpy
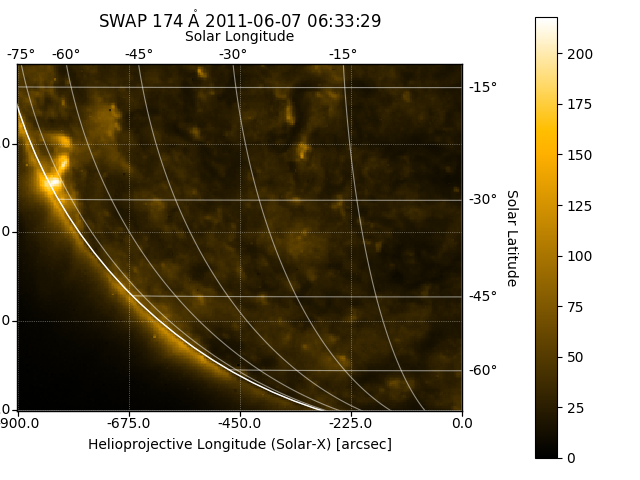
简单的例子 (来自官网):
1 2 3 4 5 6 7 8 9 10 11 12 13 14 15 16 17 18 %matplotlib inline import sunpy.map import matplotlib.pyplot as pltimport sunpy.data.sampleaia = sunpy.map .Map(sunpy.data.sample.AIA_171_IMAGE) fig = plt.figure(1 , (5 , 5 ), dpi=100 ) ax = plt.subplot(111 , projection=aia) aia.plot() aia.draw_limb() aia.draw_grid() aia.draw_limb() plt.colorbar();
/home/lydia/miniconda3/lib/python3.6/site-packages/sunpy/map/sources/sdo.py:48: SunpyDeprecationWarning: Use Matplotlib to load the colormaps
self.plot_settings['cmap'] = cm.get_cmap(self._get_cmap_name())
png
获取一些常数:
1 2 3 from sunpy.sun import constants as conprint (con.au)
Name = Astronomical Unit
Value = 149597870700.0
Uncertainty = 0.0
Unit = m
Reference = IAU 2012 Resolution B2 Name = Solar radius
Value = 695508000.0
Uncertainty = 26000.0
Unit = m
Reference = Allen's Astrophysical Quantities 4th Ed.常见数据文件读写
一般情况
1 2 3 4 f = open (filename, 'w' ) ... ... f.close()
更好的用法: 1 2 3 with open (filename, 'w' ) as f: ... ...
txt, csv 文件读写
逐行读取整行的方式:strip
可以用来去掉读入的每行末尾的 ''
1 2 3 4 5 lines = [] with open ('data/data.csv' , 'r' ) as f: for line in f: lines.append(line.strip().split(',' )) lines
[['col1', 'col2', 'col3'],
['row1', '1', '1e1'],
['row2', '2', '2e-1'],
['row3', '3', '3e+2']]
使用 numpy, 读取后直接转成数组的方式 (推荐):np.loadtxt, np.genfromtxt (写文件是
np.savetxt)
e.g.
1 2 3 >>> import numpy as np>>> arr = np.loadtxt(fname, skiprows=1 , delimiter=',' ) >>> col1, col2 = np.loadtxt(fname, skiprows=1 , usecols=(1 , 2 ), unpack=True )
np.genfromtxt 和 np.loadtxt 类似,
增加了处理 missing values 的功能.
例 (这里使用功能更多的 np.genfromtxt 代替
np.loadtxt):
1 2 3 4 5 6 arr = np.genfromtxt('data/data.csv' , skip_header=1 , names=('col1' , 'col2' , 'col3' ), dtype=('U15' , 'int' , 'float' ), delimiter=',' ) print (arr[['col1' , 'col2' ]])
[('row1', 1) ('row2', 2) ('row3', 3)]1 2 3 4 5 6 7 8 arr = np.genfromtxt('data/data2.csv' , skip_header=1 , names=('col1' , 'col2' , 'col3' ), dtype=('U15' , 'int' , 'float' ), missing_values=None , filling_values=('' , 0 , np.nan), delimiter=',' ) print (arr)
[('row1', 0, 10. ) ('', 2, 0.2) ('row3', 3, nan)]
一般而言, 对于一个由分隔符分隔的字符串, 转成一个数组的方式:np.fromstring(string, dtype=float, count=-1, sep='')
1 np.fromstring('0 1 2' , dtype=int , sep=' ' )
array([0, 1, 2])1 np.fromstring('0., 1., 2.' , sep=',' )
array([0., 1., 2.])numpy save 文件读写
1 2 3 4 np.save('fname' , arr) np.savez('fname' , arr) np.savez_compressed('fname' , arr) np.load('fname.npz' )
1 2 3 arr = np.ones(5 ) np.savez('data/np_array' , a=arr, b=0 )
data/np_array.npz1 2 3 data = np.load('data/np_array.npz' ) print ((data['a' ], data['b' ], int (data['b' ])))
(array([1., 1., 1., 1., 1.]), array(0), 0)IDL sav 文件读取
1 2 from scipy.io.idl import readsavdata = readsav('dname.sav' , verbose=True , python_dict=False )
默认读出的是scipy.io.idl.AttrDict类型, 即 key
的大小写不敏感.python_dict=True 即可.
1 2 3 4 5 6 7 8 from scipy.io.idl import readsavdata = readsav('data/myidlfile.sav' ) print (type (data))print (data.keys()) print (data['X' ].shape) data = readsav('data/myidlfile.sav' , python_dict=True ) print (type (data))print (data['x' ].shape)
<class 'scipy.io.idl.AttrDict'>
dict_keys(['x', 'y', 'str'])
(25,)
<class 'dict'>
(25,)FITS 文件读取
参考:http://docs.astropy.org/en/stable/io/fits https://python4astronomers.github.io/astropy/fits.html
[Note]1 from astropy.io import fits as pyfits
1 from astropy.io import fits
fits.open 1 2 3 4 5 6 7 8 9 10 11 12 13 >>> from astropy.io import fits>>> hdulist = fits.open ('<filename>.fit' )>>> hdulist.info() Filename: <filename>.fit No. Name Type Cards Dimensions Format 0 PRIMARY PrimaryHDU ... ... ...1 ENERGIES BinTableHDU ... ... ...>>> hdu = hdulist[0 ]>>> hdu.data >>> hdu.header['<key>' ] >>> hdu.writeto('<filename>.fits' ) >>> hdulist.writeto('<filename>.fits' )
1 2 3 4 >>> hdu = fits.PrimaryHDU()>>> hdu.writeto('<filename>.fits' ) >>> hdu.writeto('<filename>.fits' , clobber=True )
fits.getdata, fits.getheader 1 2 >>> data = fits.getdata('<filename>.fit' )>>> header = fits.getheader('<filename>.fit' )
1 2 3 4 5 >>> import sunpy.io>>> hdulist = sunpy.io.read_file('<filename>.fits' ) >>> hdu = hdulist[1 ]>>> hdu.data
1 2 3 >>> import sunpy.map >>> smap = sunpy.map .Map('<filename>.fits' )
例:
1 2 3 from astropy.io import fitsfname = 'scripts-sunpy/plothmi/data/hmi.B_720s.20150827_052400_TAI.field.fits' hdulist = fits.open (fname)
Filename: scripts-sunpy/plothmi/data/hmi.B_720s.20150827_052400_TAI.field.fits
No.    Name      Ver    Type      Cards   Dimensions   Format
  0  PRIMARY       1 PrimaryHDU       6   ()
  1                1 CompImageHDU    155   (4096, 4096)   int32
1 2 3 hdulist.verify('silentfix+warn' ) hdu = hdulist[1 ] hdu.data.shape
(4096, 4096)1 2 3 4 import sunpy.iohdulist = sunpy.io.read_file(fname) hdu = hdulist[1 ] hdu.data.shape
(4096, 4096)其他包和软件